
Homemade Chicken Tenders
Buttermilk-brined chicken tenders with a shatteringly crispy double-dredged coating. Eight minutes of prep, ten minutes in the oil, and a stack of tenders that make the drive-through feel like a waste of gas.
Tasted & written by Rachel
Prep
8 min
Cook
10 min
Total
18 min
Serves
4
The Key
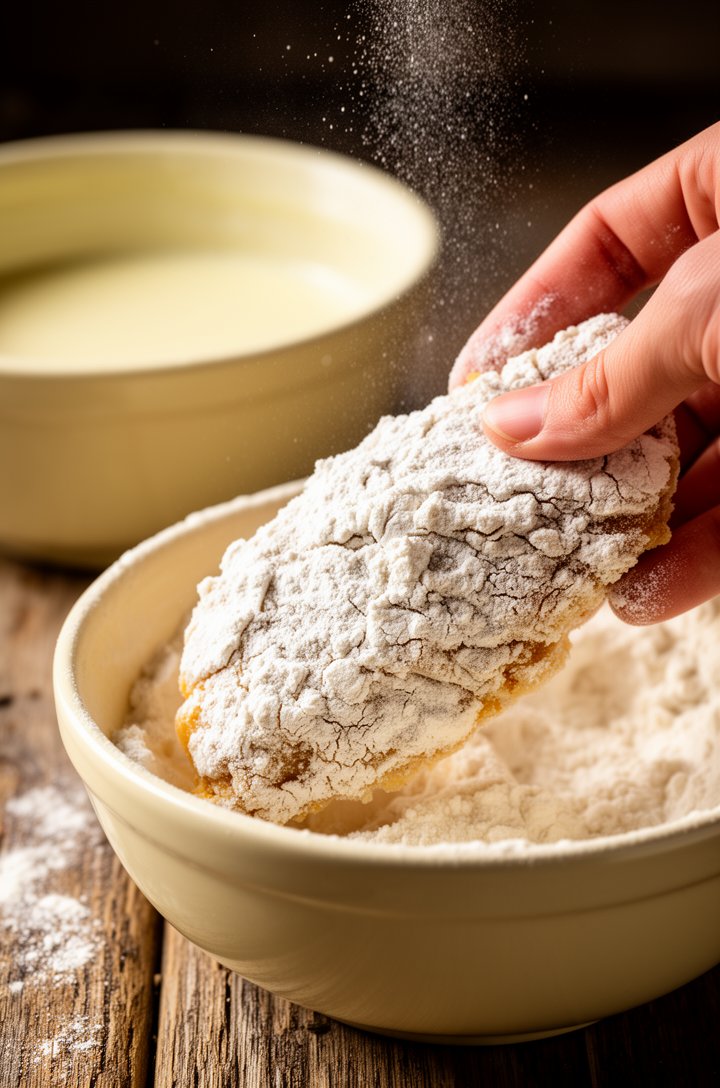
The double dredge is the whole game. First pass through flour creates a dry surface for the buttermilk to grab onto. The buttermilk soaks into that flour layer. Second pass through flour clings to all that moisture and builds the craggy, textured surface that fries up shatteringly crispy. Skip the second dredge and you get a thin, flat coating. Do it, and you get the ridges.
Mia asked for chicken tenders three nights in a row last week. Not the frozen ones — the ones I made that one time with the buttermilk. She was very specific about this. Noah just pointed at her plate and yelled. So I made them again, and then again, and now I guess this is what we eat.
The move is buttermilk plus a double dredge. You dip the chicken in seasoned flour, then buttermilk, then back through the flour. That second pass is where the craggy bits form — the ridges and peaks that fry up into the kind of crust you actually want to eat on its own. It's not complicated. It's barely even messy, once you commit to the one-wet-hand-one-dry-hand system.
David ate six standing over the stove and called it quality control.
The baking powder is the quiet hero here. Half a teaspoon in the flour creates tiny air pockets that puff up in the hot oil. You don't taste it. You just notice the coating is lighter, crunchier, more interesting than the flat shell you get from flour alone. It's a diner trick that works every single time.
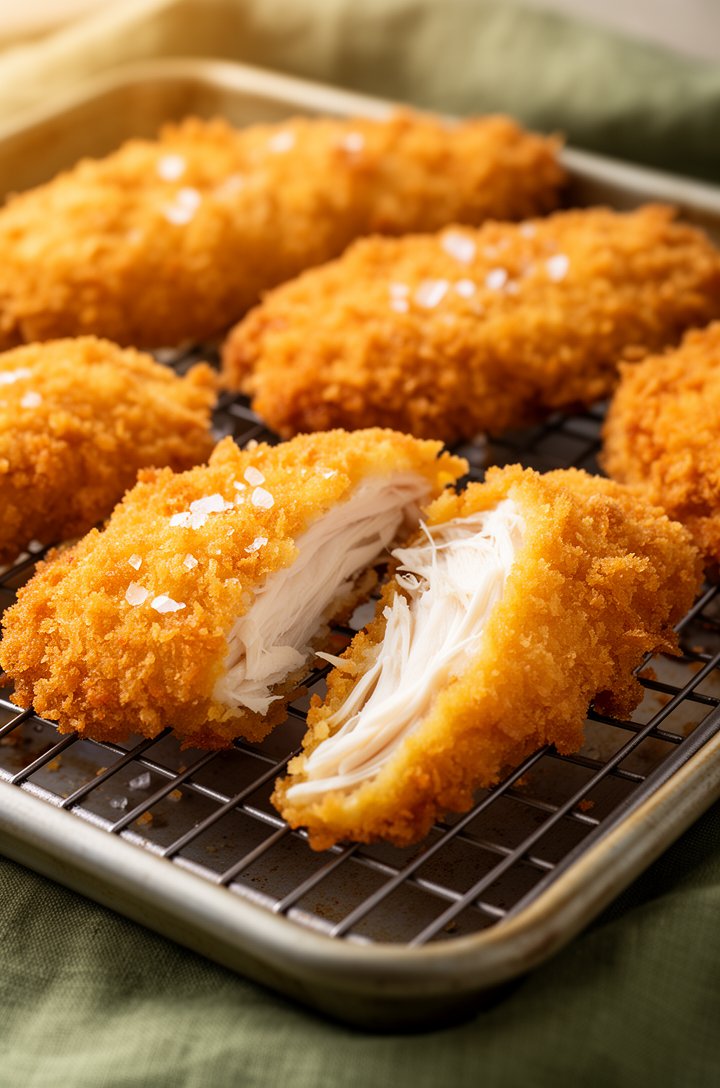
Don't skip the five-minute rest after breading. I know — you want to get them in the oil. But that rest lets the coating hydrate and bond to the chicken. Without it, half the crust stays behind in the pan. I learned this the hard way, twice.
The oil temperature matters more than anything else in this recipe. Too cold and the coating absorbs grease instead of crisping. Too hot and the outside burns while the inside stays raw. 350°F is the sweet spot. A candy thermometer costs four dollars and saves every batch.
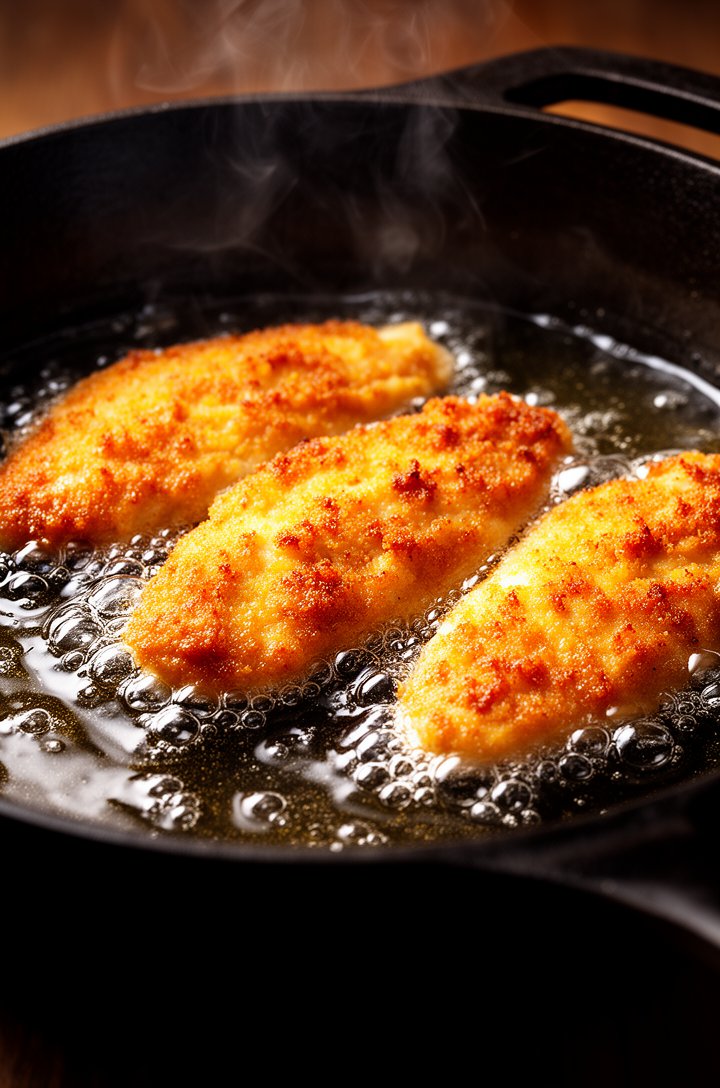
Fry in batches. I know it's slower. But crowding the pan drops the oil temperature by 30 or 40 degrees, and you end up steaming the chicken instead of frying it. Pale, soggy, disappointing. Three or four tenders at a time. Let the oil recover between batches. This is the price of crispy.
Priya came over last week and watched me make a batch. She took one bite and immediately asked for the buttermilk ratio. Her kids have the same frozen-tender fatigue that mine do. I wrote it on a sticky note and handed it over. She texted me a photo of her version two days later. Her coating was better than mine. I'm still thinking about it.
Mise en place
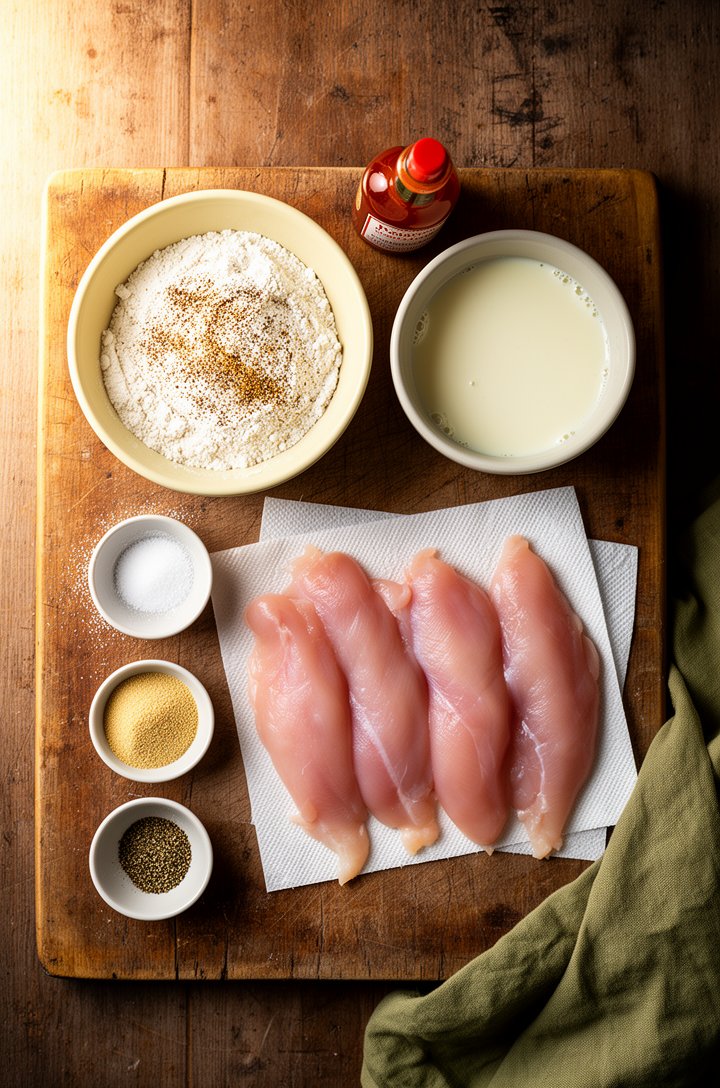
Ingredients
- 1 lb chicken tenderloinspatted dry
- 1 cup All-Purpose Flour
- 1 tsp Baking Powder
- 0.5 tsp Kosher Salt
- 0.5 tsp Black Pepper
- 0.5 tsp Garlic Powder
- 0.75 cup Buttermilk
- 1 large egg
- 2 tsp Hot Sauce
- vegetable oil, for frying (about 3 inches in the pan)
Optional extras
- 0.5 tsp PaprikaOptional
Garnish
- 2 tbsp Fresh ParsleychoppedOptional
The Method
Instructions
- 01
Mix the flour, baking powder, salt, pepper, and garlic powder in a shallow bowl. In a second bowl, whisk buttermilk, egg, and hot sauce until smooth.
Done when:Dry mix is uniform with no visible pockets of baking powder. Wet mix is smooth and pale yellow with no egg streaks.
- 02
Pat each chicken tender completely dry with paper towels. Remove the white tendon if present by gripping it with a paper towel and pulling firmly while scraping with a knife.
Done when:Surface of each tender feels tacky-dry, not slippery. Tendons removed — the meat lies flat without curling.
- 03
Dredge each tender in flour, shake off excess, dip into buttermilk mixture, then back through the flour a second time. Press the flour in firmly. Set coated tenders on a wire rack and let them rest for 5 minutes.
Done when:Coating looks thick and shaggy with visible craggy ridges. No wet patches showing through. After resting, the surface is matte and slightly tacky — this means the coating has set.
- 04
Pour about 3 inches of oil into a heavy-bottomed skillet or dutch oven. Heat over medium-low until a candy thermometer reads 350°F.
Done when:Thermometer reads 350°F. A pinch of flour sizzles immediately when dropped in but doesn't burn.
- 05
Carefully lower 3-4 tenders into the oil — do not crowd the pan. Fry for 3-4 minutes per side, flipping once.
Done when:Deep golden brown on both sides. Internal temperature reads 165°F on an instant-read thermometer. Coating is audibly crispy when tapped with tongs.
- 06
Transfer to a wire rack set over a baking sheet. Season with a pinch of salt immediately. Repeat with remaining tenders, letting the oil return to 350°F between batches.
Done when:Oil is back to 350°F before adding the next batch. All tenders resting on the rack, not on paper towels.
Where it goes wrong
Common mistakes
- ✕Crowding the pan — drops the oil temperature 30-40°F and you steam instead of fry, producing pale soggy coating
- ✕Skipping the rest after breading — the coating slides right off in the oil and you're left frying naked chicken
- ✕Draining on paper towels instead of a wire rack — the bottom sits in grease and goes soft within minutes
- ✕Oil too hot — above 375°F the outside burns before the inside cooks through, leaving raw chicken under dark crust
Context
Compared to the usual
This is the classic Southern-diner approach — buttermilk, seasoned flour, shallow-fried. The oven-baked route (toasted panko, mayo-mustard binder, 390°F for 15 minutes) is legitimately good if you want less mess, but you lose the shatteringly crispy crust that makes the fried version worth the oil. The air fryer splits the difference — crispier than baked, less crispy than fried, far less cleanup than either. We tested all three. The fried version won by a mile.
Glossary
Techniques used
- Double dredge
- Coating the chicken in flour, then wet mixture, then flour again. The second flour pass creates the thick, craggy texture that makes homemade tenders better than the single-dip fast-food version.
- Carry-over cooking
- The chicken continues cooking for a few degrees after leaving the oil. Pull at 163°F and it'll coast to 165°F on the rack.
- Spider strainer
- A wide, flat wire-mesh skimmer for lifting fried food out of oil. Tongs work but a spider is gentler on the coating.
Riffs
Variations
Nashville hot
Mix 2 tbsp cayenne, 1 tbsp brown sugar, 1 tsp paprika, and 1/2 tsp garlic powder into 3 tbsp of the frying oil. Brush over the finished tenders. Bring milk.
Parmesan-herb
Add 1/3 cup finely grated Parmesan and 1 tsp dried Italian seasoning to the flour mixture. The cheese browns fast, so watch the heat.
Oven-baked version
Toast 1.5 cups panko at 390°F for 4 minutes. Use mayo-mustard as the binder instead of buttermilk. Bake on a rack at 390°F for 15 minutes. Not the same, but respectable.
Q & A
Frequently asked
Can I use chicken breast instead of tenderloins?
Yes. Slice breasts into strips about 3/4-inch thick, lengthwise. They'll need an extra minute per side since they're usually thicker than true tenderloins.
What oil is best for frying?
Vegetable, canola, or peanut oil. All have high smoke points and neutral flavor. Avoid olive oil — the smoke point is too low and it'll taste off.
Can I make these gluten-free?
Swap the all-purpose flour for a 1:1 gluten-free flour blend. The coating won't be quite as craggy but it still works.
How do I know the oil is hot enough without a thermometer?
Drop a small pinch of flour into the oil. If it sizzles immediately and floats, you're at about 350°F. If it sinks and sits — not ready. If it burns instantly — too hot, pull it off the heat.
Storage
Airtight container in the fridge for up to 3 days. Keep them in a single layer if possible — stacking softens the coating.
Reheating
400°F oven on a wire rack for 8-10 minutes until the coating crisps back up. Air fryer at 375°F for 5 minutes works even better. Never microwave — it turns the crust into a wet blanket.
Freezing
Freeze uncooked breaded tenders in a single layer on a sheet pan until solid, then transfer to a freezer bag. Good for 3 months. Fry from frozen at 325°F for 6-7 minutes per side until golden and cooked through (165°F internal).
Make ahead
Bread the tenders up to 4 hours ahead and refrigerate uncovered on a wire rack. The coating actually sets up better with fridge time. Fry straight from the fridge — add 1 minute per side.
Serve with
Honey mustard, ranch, or barbecue sauce for dipping. French fries or coleslaw on the side. For a full plate: mashed potatoes and a simple green salad. David's running club eats these in a slider bun with pickles and mayo.