
Onigiri (Japanese Rice Balls) with 4 Fillings
Sticky, salty, endlessly packable Japanese rice balls with four fillings: salmon, tuna mayo, umeboshi, and seasoned sesame. The only real technique is learning to stop squeezing.
Tasted & written by Rachel
Prep
15 min
Cook
25 min
Total
40 min
Serves
6
The Key
The shaping is three gentle presses per side, rotating the triangle a third-turn each time. That's nine total presses. Count them if you have to. If you're squeezing hard enough that your knuckles go white, the rice is already too compressed. Onigiri should hold together, not feel like a stress ball.
Mia asked for 'triangle rice' after seeing it in a show. I had no idea what she meant until she drew a picture — a triangle with a black stripe at the bottom. Onigiri. So I made six of them on a Tuesday afternoon, and David ate four before the kids got to the table.
Now they're a weekend constant. The technique is simpler than every recipe makes it sound: warm rice, wet hands, gentle pressure. That's it. The filling is a bonus.
The rice matters more than the filling. Japanese short-grain — Koshihikari or Calrose — cooked plain with no vinegar. It needs to be warm when you shape it, sticky enough to hold but not so hot that you can't stand it. I made the mistake of letting it cool completely the first time. Cracked on every press. David suggested microwaving it. That works.
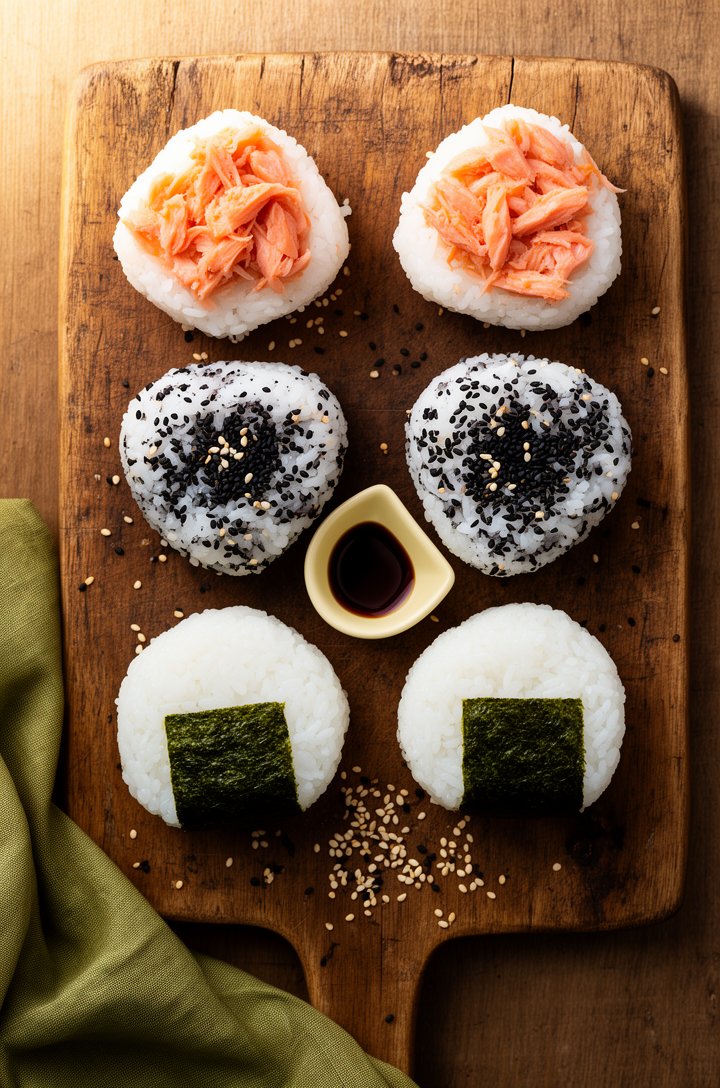
Four fillings here because nobody in this house agrees on anything. Salmon for David. Tuna mayo for Mia. Umeboshi for me (too sour for the kids, which means I actually get to eat mine). And black sesame mixed straight into the rice for Noah, who doesn't trust anything hidden inside food.
The shaping takes about thirty seconds per onigiri once you get the rhythm. Three presses per side. Rotate. Three more. Rotate. Done. Mia has been doing it herself since the second time — her triangles look more like pyramids, but they hold together, and she's five, so we're counting it.
Wrap them in plastic for lunch boxes, eat them warm at the counter, or — if you're David — stand at the fridge at 11pm and eat a cold one straight from the shelf. They're good all three ways.
Mise en place
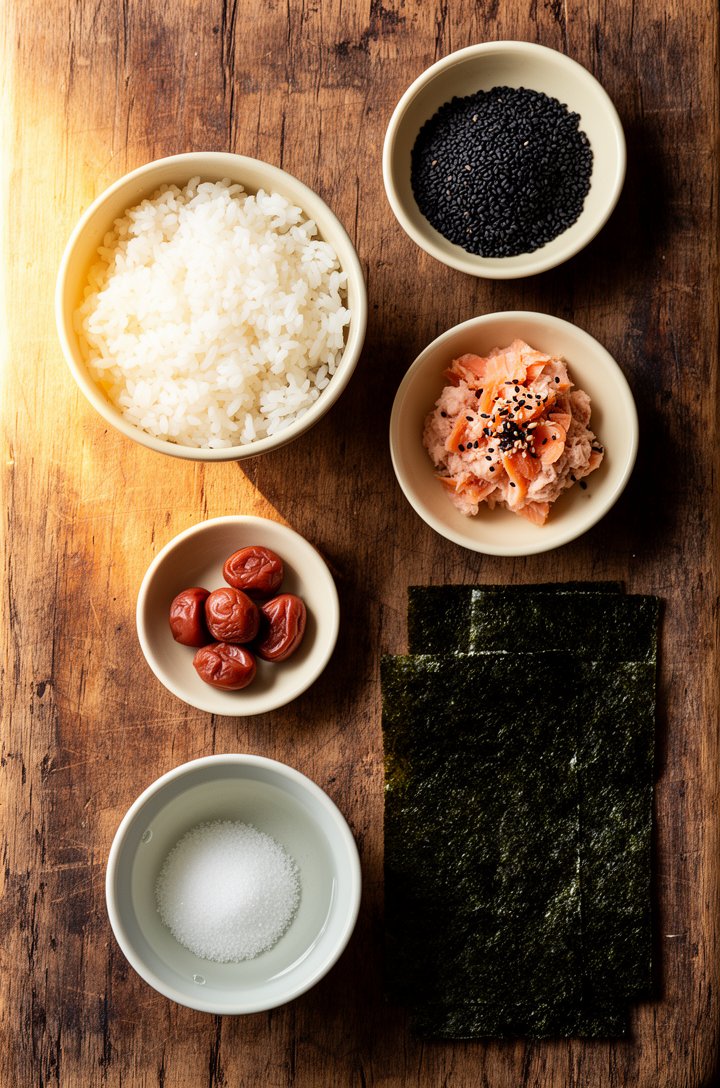
Ingredients
- 3 cups Japanese short-grain rice (sushi rice)rinsed until water runs mostly clear
- 3¼ cups water (for cooking rice)
- 1 tsp fine sea salt (plus extra for hands)
- 4 full-sized nori sheets, each cut lengthwise into thirds
Salmon Filling
- 1 salmon fillet (180g)
- 1 tbsp sake (optional)Optional
- 1 tsp toasted white sesame seeds
Tuna Mayo Filling
- 100g canned tuna chunks in brine, well drainedwell drained
- 1 tbsp Japanese mayo (Kewpie or similar)
- 1 tsp white miso paste
- ½ tsp sesame seeds
Umeboshi Filling
- 5-6 umeboshi (Japanese pickled plums), stones removedstones removed
Seasoned Sesame (mixed into rice)
- 2 tbsp black sesame seeds
- 2 tbsp furikake (any variety)Optional
The Method
Instructions
- 01
Rinse the rice in a fine-mesh strainer under cold water, swirling gently with your hand, until the water runs mostly clear — about 4-5 rinses.
Done when:Water draining from the rice looks slightly cloudy rather than milky white. A faint haze is fine.
- 02
Cook the rice with 3¼ cups water in a rice cooker or covered saucepan (bring to boil, reduce to lowest heat, cook 15 minutes, then rest 10 minutes with lid on — no peeking).
Done when:Every grain is tender and slightly sticky when pressed between two fingers. No hard center, no mushy edges.
- 03
While the rice cooks, prepare the salmon filling: poach the salmon fillet in 2 cups of simmering water with a tablespoon of sake for 10-15 minutes until cooked through. Flake with a fork and toss with sesame seeds and a pinch of salt.
Done when:Salmon flakes easily into large, moist chunks with no translucent center. The flesh is uniformly opaque.
- 04
Prepare the tuna mayo: drain the tuna thoroughly — press it against the side of the can to squeeze out all the liquid. Mix with mayo, miso, and sesame seeds.
Done when:Mixture is creamy and cohesive, not watery. You should be able to scoop a teaspoon that holds its shape.
- 05
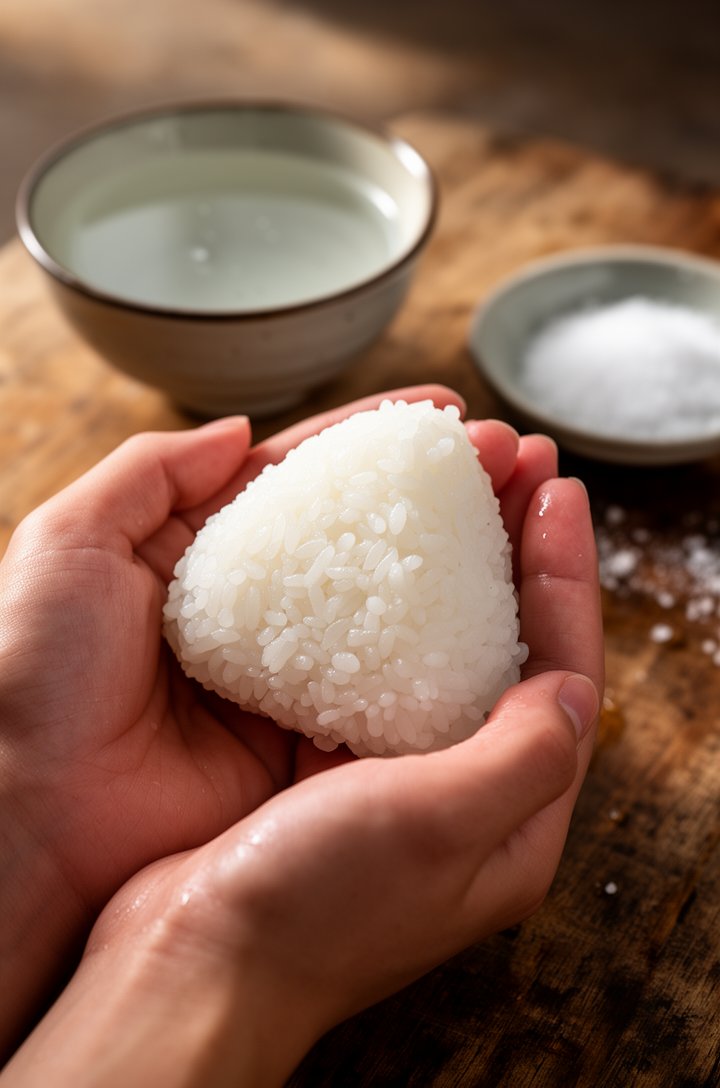
Fluff the cooked rice gently with a rice paddle or fork. Let it cool just until you can handle it — it should still be quite warm. Do not let it go cold.
Done when:Rice is warm enough to be slightly uncomfortable in your palm but not burning. Around 50-60°C — you can hold it for a few seconds.
- 06
Set up your shaping station: a small bowl of water, a pinch dish of salt, your fillings, and the nori strips. Wet both hands thoroughly and rub a small pinch of salt across your palms.
Done when:Palms are evenly damp and lightly salted — rice won't stick when you touch a test grain.
- 07
Scoop about 90-100g of rice (a generous handful) into one palm. Press a shallow well in the center with your thumb and add about a teaspoon of your chosen filling. Fold the rice over the filling to enclose it completely.
Done when:Filling is fully sealed inside with no gaps or thin spots where it could break through.
- 08
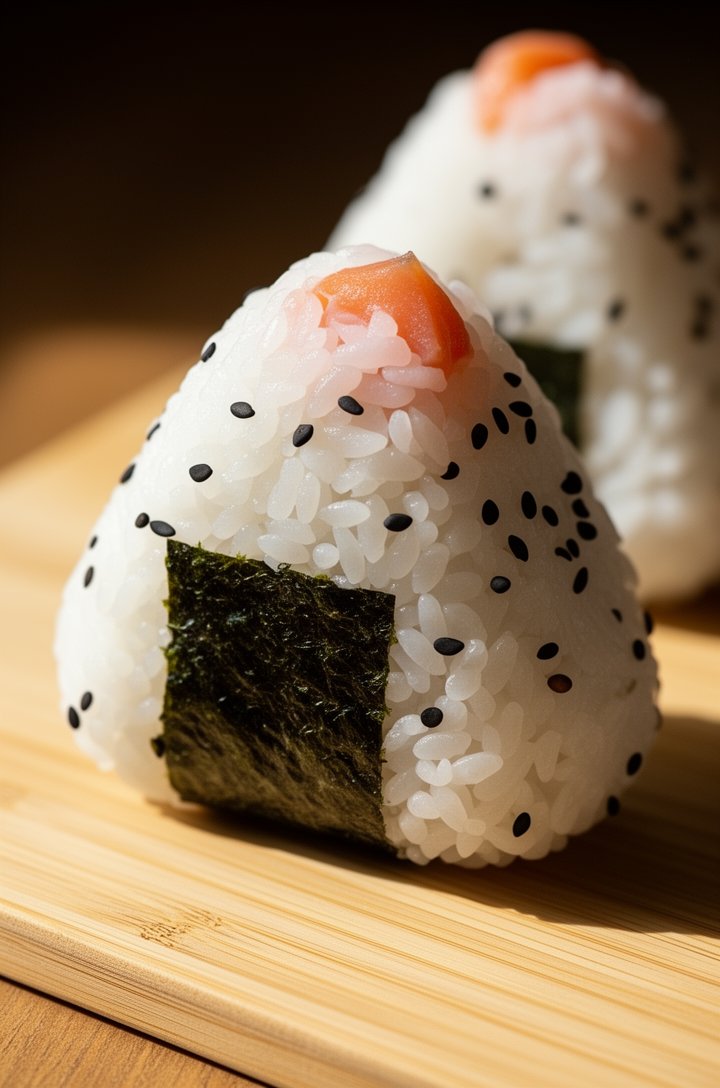
Shape into a triangle: cup both hands into an L-shape and gently press the rice, rotating after each press. Use 3-4 presses per side — firm enough to hold together, gentle enough that individual grains are still visible. Do not squeeze.
Done when:Triangle holds its shape when you set it down. Edges are defined but not sharp. You can still see individual rice grains on the surface — if they're smashed together, you pressed too hard.
- 09
Wrap a nori strip around the base of each onigiri, rough side facing the rice. Press gently so it adheres.
Done when:Nori clings to the rice on its own without peeling away. The strip covers the bottom third of the onigiri.
- 10
Repeat with the remaining rice and fillings. Re-wet and re-salt your hands before each onigiri. For the sesame variation, mix black sesame seeds directly into a portion of rice before shaping.
Done when:All onigiri are shaped, filled, and wrapped. Each one sits upright on the board without toppling.
Where it goes wrong
Common mistakes
- ✕Using cold rice — the grains crack instead of bonding, and the triangle falls apart in your hand
- ✕Squeezing too hard — you get a dense rice brick instead of a fluffy triangle. Three gentle presses per side, that's it.
- ✕Skipping the hand water — sticky rice on dry palms means you lose half the onigiri to your fingers
- ✕Overfilling — a heaping tablespoon of filling sounds reasonable until it bursts through the side on the second bite
Context
Compared to the usual
Convenience-store onigiri in Japan are engineered with a plastic wrapper that keeps the nori separate from the rice until you open it — a crisp-nori maximalist's dream. This is the home version, where the nori goes slightly soft against the warm rice. Purists will tell you that's wrong. I'll tell you that Mia prefers it soft and Noah won't eat it crisp, so we're doing it this way.
Glossary
Techniques used
- Onigiri
- Japanese rice balls — usually triangular, filled, and wrapped with nori. The name comes from 'nigiru,' meaning to grip or squeeze. Japan's most popular portable meal.
- Umeboshi
- Japanese pickled plums. Intensely sour and salty — one per onigiri is plenty. They also act as a natural preservative, which is why they've been the classic filling for centuries.
- Nori
- Dried seaweed sheets. Buy the kind sold for sushi — it should be dark green-black and snap cleanly when you bend it. If it's olive-colored and limp, it's stale.
- Furikake
- A Japanese rice seasoning blend — usually nori flakes, sesame seeds, dried fish, and salt. Dozens of varieties exist. Noritamago (seaweed and egg) is a good starting point.
- Kewpie
- Japanese mayonnaise made with rice vinegar and egg yolks only (no whites). Richer and tangier than American mayo. The squeeze bottle with the baby on it — you've probably seen it.
Riffs
Variations
Yaki Onigiri (grilled)
Brush shaped onigiri with soy sauce and grill in a dry nonstick pan over medium heat, 2-3 minutes per side until golden and crispy. The soy sauce caramelizes into a salty crust. Skip the nori wrap for these.
Spam Musubi style
Slice Spam into thin rectangles, pan-fry until crispy, and lay on top of the rice before wrapping with a full nori strip. David calls this 'the Hawaiian one' and eats three.
Spicy salmon
Mix the flaked salmon with a teaspoon of sriracha and a squeeze of Kewpie mayo. The heat level is toddler-safe — Mia approves, Noah remains suspicious.
Q & A
Frequently asked
Can I use sushi rice?
Sushi rice and Japanese short-grain rice are the same thing. Just don't add vinegar — onigiri rice is plain, lightly salted, not seasoned like sushi.
Do I need a rice cooker?
No. A regular pot with a tight lid works fine: bring to boil, drop to the lowest heat for 15 minutes, rest 10 minutes without lifting the lid. The resting step is where the magic happens.
Can I make onigiri with brown rice?
Technically yes, but it won't hold together as well — brown rice has less surface starch. You'll need to press harder, and the texture will be denser. Not terrible, just different.
How long do they keep?
Wrapped tightly in plastic wrap, 24 hours in the fridge. The nori softens but the flavor is still good. Beyond that, the rice dries out.
Storage
Individually wrapped in plastic wrap, refrigerated, up to 24 hours. The rice hardens past that point. Do not store unwrapped — the surface dries out within an hour.
Reheating
Microwave wrapped in a damp paper towel for 30-40 seconds. The steam softens the rice back to its original texture. Or eat cold — they're designed to be room temperature food.
Freezing
Wrap individually in plastic wrap, then into a freezer bag. Freeze up to 1 month. Reheat from frozen: microwave with damp paper towel for 60-90 seconds. Skip fillings with mayo for freezing — the texture goes weird.
Make ahead
Shape and wrap in plastic wrap up to 24 hours ahead. Refrigerate immediately. For best nori texture, wrap the nori strip separately and attach just before eating.
Serve with
A thermos of miso soup, some pickled cucumber, edamame if you're feeling ambitious. For packed lunches, wrap each onigiri individually in plastic wrap and tuck them into a bento box. A soy sauce packet on the side for dipping if you want, but they shouldn't need it.